
How to Apply Sk8tape®
The Complete Skate Makeover
BEFORE YOU START, READ THIS:
- Make sure your boots are completely dry.
- Sk8tape® will stretch as you pull it off the roll, but allow it to retract & shrink back to its original, unstretched length for better contouring & adhesion.
- If you are doing a complete Sk8tape® makeover (such as for competition or to change the color of your boots), you should first remove your old laces before starting. For Step 5, follow option 5B.
- We recommend changing Sk8tape® every 1 to 2 months.
REQUIRED TOOLS:
- 1 wide roll Sk8tape® (1 1/2-inch)
- 1 narrow roll Sk8tape® (3/4-inch)
- scissors
OPTIONAL TOOLS:
- utility knife for precision trimming
- hole punch for lace hooks
- awl, skewer, knitting needle, or golf tee for lace holes
OTHER WAYS TO USE SK8TAPE®
- Specific areas: Apply strips to spot areas, such as the toe area & the inner side of the boot for protection against wear & tear from lunges, jumps, falls, etc..
- Securing laces: After lacing up your boots, wrap narrow Sk8tape® around your ankles over your laces.
- Heels & soles: Protect & waterproof your heels & soles with narrow Sk8tape® in black.
- Be creative: Paint or decorate your boots. Sk8tape® is your canvas.
Narrow Sk8tape® to Contour Curves

- REMEMBER: Sk8tape® will stretch as you pull it off the roll, but allow it to retract to its original, unstretched length.
- Apply narrow Sk8tape® on the boot right along the edge of the sole. Continue around the boot. Then cut Sk8tape® from the roll. (Excess Sk8tape® hanging over the sole can be trimmed later with a utility knife.)
Wide Sk8tape®
Apply WIDE Sk8tape® above & slightly overlapping the previously applied narrow strip. We recommend starting at the front of the boot & continuing toward the back.
OPTION 2A:
You can either cut the Sk8tape® from the roll at the back as shown in Figure 2A...
OR
OPTION 2B:
...or you can continue around the back to the other side with the same strip & cut as shown in Figure 2B.
Keep Going
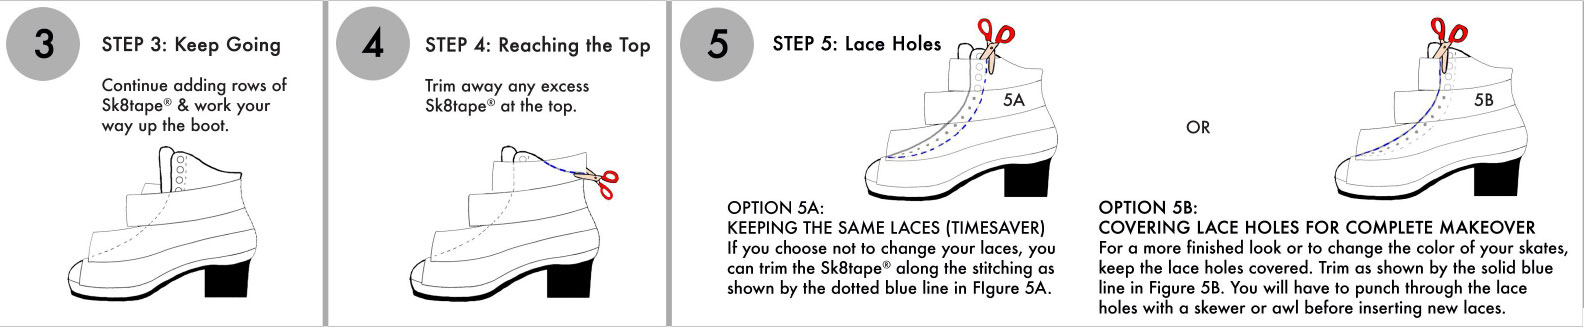
Continue adding rows of Sk8tape® & work your way up the boot.
Reaching the Top
Trim away any excess Sk8tape® at the top.
Lace Holes
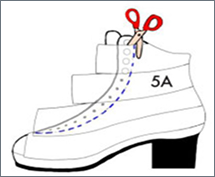
OPTION 5A:
KEEPING THE SAME LACES (TIMESAVER) If you choose not to change your laces, you can trim the Sk8tape® along the stitching as shown by the dotted blue line in Figure 5A.
OR
OPTION 5B:
COVERING LACE HOLES FOR COMPLETE MAKEOVER For a more finished look or to change the color of your skates, keep the lace holes covered. Trim as shown by the solid blue line in Figure 5B. You will have to punch through the lace holes with a skewer or awl before inserting new laces.
Hooks

An easy way to trim around the lace hooks is with a single-hole punch. The bottom base of the punch fits perfectly over each hook. Just feed the Sk8tape® strip into the hole punch like a piece of paper, place the base of the tool over the hook, & punch the hole.
Toe Area
Apply a strip of NARROW Sk8tape® across the front toe area almost along the sole. Continue adding strips across. (For a more finished look, make sure the strips are long enough to span across the entire toe area.) Trim along the sole.
Tongue (optional)
Use WIDE Sk8tape® to cover the tongue. You can start at the top of the tongue near the shin area & work your way down. Trim away any excess Sk8tape®.
How to Apply Sk8tape®
The Complete Skate Makeover
BEFORE YOU START, READ THIS:
- Make sure your boots are completely dry.
- Sk8tape® will stretch as you pull it off the roll, but allow it to retract & shrink back to its original, unstretched length for better contouring & adhesion.
- If you are doing a complete Sk8tape® makeover (such as for competition or to change the color of your boots), you should first remove your old laces before starting. For Step 5, follow option 5B.
- We recommend changing Sk8tape® every 1 to 2 months.
REQUIRED TOOLS:
- 1 wide roll Sk8tape® (1 1/2-inch)
- 1 narrow roll Sk8tape® (3/4-inch)
- scissors
OPTIONAL TOOLS:
- utility knife for precision trimming
- hole punch for lace hooks
- awl, skewer, knitting needle, or golf tee for lace holes
OTHER WAYS TO USE SK8TAPE®
- Specific areas: Apply strips to spot areas, such as the toe area & the inner side of the boot for protection against wear & tear from lunges, jumps, falls, etc..
- Securing laces: After lacing up your boots, wrap narrow Sk8tape® around your ankles over your laces.
- Heels & soles: Protect & waterproof your heels & soles with narrow Sk8tape® in black.
- Be creative: Paint or decorate your boots. Sk8tape® is your canvas.
Narrow Sk8tape® to Contour Curves
- REMEMBER: Sk8tape® will stretch as you pull it off the roll, but allow it to retract to its original, unstretched length.
- Apply narrow Sk8tape® on the boot right along the edge of the sole. Continue around the boot. Then cut Sk8tape® from the roll. (Excess Sk8tape® hanging over the sole can be trimmed later with a utility knife.)
Wide Sk8tape®
Apply WIDE Sk8tape® above & slightly overlapping the previously applied narrow strip. We recommend starting at the front of the boot & continuing toward the back.
OPTION 2A:
You can either cut the Sk8tape® from the roll at the back as shown in Figure 2A...
OR
OPTION 2B:
...or you can continue around the back to the other side with the same strip & cut as shown in Figure 2B.
Keep Going
Continue adding rows of Sk8tape® & work your way up the boot.
Reaching the Top
Trim away any excess Sk8tape® at the top.
Lace Holes
OR
OPTION 5A:
KEEPING THE SAME LACES (TIMESAVER) If you choose not to change your laces, you can trim the Sk8tape® along the stitching as shown by the dotted blue line in Figure 5A.
OPTION 5B:
COVERING LACE HOLES FOR COMPLETE MAKEOVER For a more finished look or to change the color of your skates, keep the lace holes covered. Trim as shown by the solid blue line in Figure 5B. You will have to punch through the lace holes with a skewer or awl before inserting new laces.
Hooks
An easy way to trim around the lace hooks is with a single-hole punch. The bottom base of the punch fits perfectly over each hook. Just feed the Sk8tape® strip into the hole punch like a piece of paper, place the base of the tool over the hook, & punch the hole.
Toe Area
Apply a strip of NARROW Sk8tape® across the front toe area almost along the sole. Continue adding strips across. (For a more finished look, make sure the strips are long enough to span across the entire toe area.) Trim along the sole.
Tongue (optional)
Use WIDE Sk8tape® to cover the tongue. You can start at the top of the tongue near the shin area & work your way down. Trim away any excess Sk8tape®.